This page provides details of the baseboard construction
I have finally found a use for the weights my son bought about 15 years ago. It made gluing the foam down much easier.

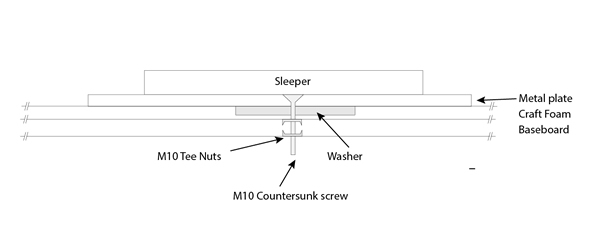
I need a way to adjust the track ends between the different boards. My idea is to cut a small piece of steel, drill a countersink slot in the top and slide a countersink bolt through. Weld a washer onto the bolt underneath the metal. This will lock the bolt in place but allow it to rotate and slide.
Then drill a hole through the baseboard and fit T nuts above and below the hole with the bolt through. This will then allow the bolt to move up and down, and the metal plate to move left to right. I can then glue the last three sleepers to the metal plate.

I have started to lay the track. I have printed off the specific Templot templates for this board. I have laid the track using the C&L Finescale parts (3 bolt chairs and 8 feet 6 inch timbers) with the chair keys alternated in direction on the basis that the track operates in both directions. It is 60 feet lengths as the line was re-laid around 1948 (with track recovered from the Elham Valley Railway) so I am assuming standard BR practice.


I was not sure whether it was ballast or ash (apparently this was used until the demise of steam and the loss of this source of material). Checking various sites ballast was around 2” in diameter (paragraph 4 and 5 of "Rail ballast: conclusions from a historical perspective") so is a scale 1.2mm. Interestingly this dimension seems to be the one used for 4mm rather than 7mm. Woodland Scenics Medium ballast is graded to 1.6” to 2.4” and Fine is 0.5” to 1.6”. The deatils are in the Woodland scenics Table. I could not find the Woodland Scenics Fine ballast easily in any decent quantities so I purchased some War World Scenics Extra Fine ballast. I compared this to the Woodland Scenics Medium ballast and it is finer so I am using this as the basis for the ballast. I have laid the ballast using dilute PVA applied with a dropper pre sprayed with water and washing up liquid to break the surface tension and allow the PVA to flow.
When I get to the station/sidings I will user finer ballast material that is available from War World Gaming. This site has a wide range of materials that I could be useful.
As you can see I have also started on the landscape.

I have used Sculptamold over the foam base. It is a strange mix of fibres and plaster.
I have washed over this with Acrylic Burnt Umber and then with Vallejo Model Color Earth Textures - Dark Earth and Earth Texture Sand. That provides the base before I apply flock.

Reference: Templot software;
World War Scenics
The spray adhesive had worked and the gorilla glue was easy to apply.

While working on the boards in the shed I did think that for may this would be an expensive option, but my aim is to make the boards as light as possible. I should explain that my hope is to paint and then flock directly onto the main flat areas.
A box of CraftFoam is just over £51 (plus VAT) for 300*600*600 (irrespective of thickness). Glue is much more expensive so I will buy a box of thicker foam - probably 10mm. This seems to be a reasonable balance, especially as the wider 2nd board will require quite a large area about 30mm thick.
I have ordered a different Foam Clay for sculpting the remaining landscape. I hope this will be lighter than say ModRoc etc. I subscribe to a WarGamer on YouTube called LukeApps. He has his own website and he was quite impressed with the FoamClay for creating light weight gaming tables, which of course they have to lug about and apparently suffer quite a lot of abuse.
Reference: Panel Systems CraftFoam
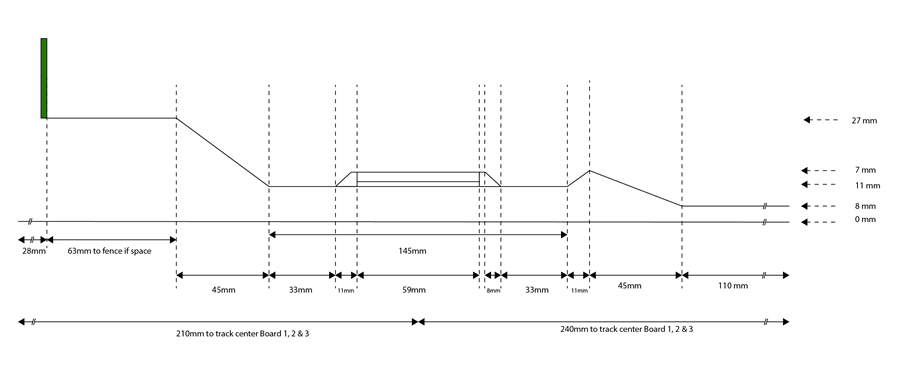
Not sure if anyone else has the same issue but I have been building the underlying structure for the scenery. I drew up the profile for the first two boards:

Then I started to stick the CraftFoam down. I bought 3mm sheets (it costs the same by volume so this seemed the least wasteful). Disaster. Having looked on the internet PVA glue seemed to be (odd in my mind) choice for sticking it down. Not very successful. Tried contact adhesive - beautiful melted mass. Then spray contact adhesive. It worked but made a dreadful mess.
I have a quantity of P45 polyurethane glue and that was ok, but an expensive option.
Then I found this video: https://www.youtube.com/watch?v=YCIYMVOMBso. Of the two he suggests 3M Super 77 is very expensive.

I removed yesterday's disaster of a foam landscape structure. As you can see glue is everywhere and most of the foam did not stick. Not pretty, but I learnt from this so that is good - isn't it?

I pre cut all the pieces and set them out ready for gluing. I have laid the large pieces of foam with contact adhesive and I had much better control this time. I treated it as paint rather than glue so it has gone where it should. They are weighted down now. Tomorrow I will glue the pieces cut for the low bank (in front of the track) and the bank that rises behind the track with Gorilla glue. That is in a silicone type tube so I should have much better control.
Once it is all glued down I can start to shape the foam ready for the clay covering. I have ordered a Foam Clay (note this is different to the first link I posted) for sculpting the remaining landscape because it is light weight and seems to work very well - I have been following some of the Wargamers/Military modellers on YouTube and they seem to have landscape down to a fine art.
Reference: Panel Systems CraftFoam

The following images show the various elements of the first two baseboards:
The baseboards are built using 9mm ply tops. The sides use a ladder approach with 18mm spacers between the two sides. The inner sides are 9mm ply. The outer sides are 4mm. These form a base.
The top is fixed and then routered to fit exactly the outer edge of the supporting structure. Then a 4mm piece of ply is fitted covering the baseboard 4mm, and then extends to the height of the scenery. rameand cross members, with laminated sides to the full height of the scenery.
A piece of 4mm ply is then fitted between the 9mm top of the baseboard and the top edge of the scenery.
This method rebates the 9mm ply top between the edges to help keep the boards rigid. This may seem excessive but this will be a long term project and needs to be robust.


There is still work to be done to adjust the sides to fit the scenery and the track bed. The board edges between the separate boards will be cut to match the profile of the scenery
Reference: AJ Ferguson - wood merchants